Running Redis on EC2 means you own everything — patching, failover, replication, backups. Amazon ElastiCache for Valkey hands all of that to AWS while giving you a Redis-compatible, open-source-backed cache engine at lower cost than ElastiCache for Redis.
This guide walks through a live migration from a self-managed Redis 7.x on EC2 to ElastiCache Valkey 8.x using Redis Shake — a battle-tested open-source tool that replicates data in real time via Redis’s own replication protocol.
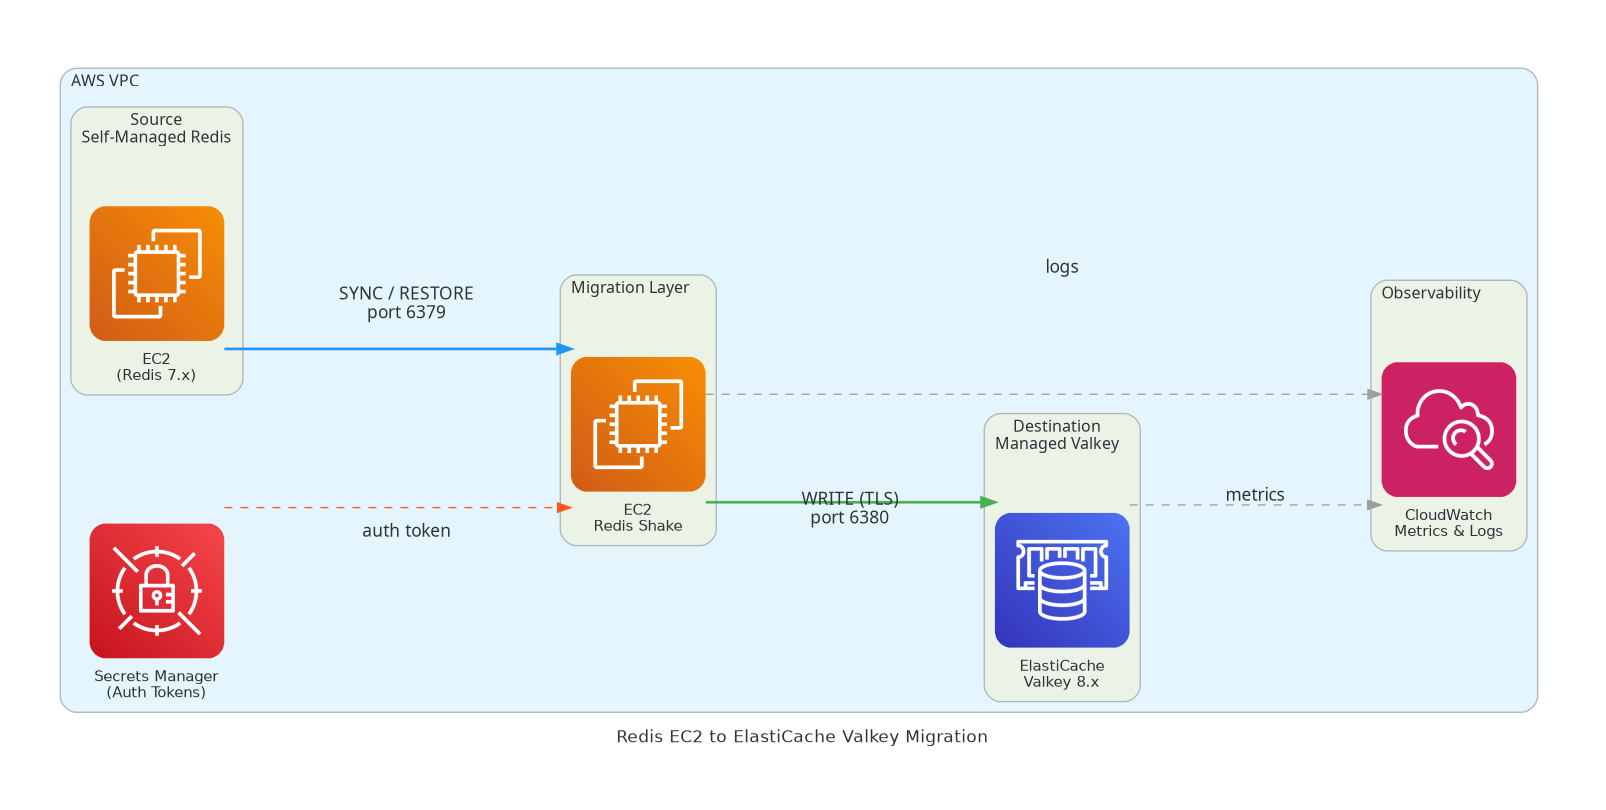
Why Valkey?
Valkey is the Linux Foundation fork of Redis, fully compatible with Redis 7.2 API. ElastiCache for Valkey is up to 33% cheaper than ElastiCache for Redis OSS on equivalent node types.
Architecture Diagram
Flow:
Redis Shake connects to source EC2 Redis as a replica (SYNC command)
It streams RDB snapshot + live AOF commands to ElastiCache Valkey
CloudWatch captures migration metrics and logs
Secrets Manager holds the ElastiCache AUTH token
Prerequisites
Requirement
Detail
Source
Redis 7.x on EC2, requirepass or no auth
Destination
ElastiCache Valkey cluster (cluster mode disabled or enabled)
Migration Host
EC2 instance with network access to both endpoints
Tool
Redis Shake v4+
Security Groups
Migration EC2 → port 6379 (source), port 6380 TLS (ElastiCache)
Cluster Mode
If your EC2 Redis uses cluster mode, set cluster_mode: true in Redis Shake config and target an ElastiCache Valkey cluster-mode-enabled replication group.
ElastiCache Valkey enforces TLS (transit-encryption-enabled). Redis Shake will connect on port 6380 with --tls flags.
Step 2 — Prepare Source EC2 Redis
Redis Shake connects to source Redis as a replica using the SYNC/PSYNC protocol. Ensure:
# On source Redis EC2 — check replication is not blockedredis-cli -h localhost -p 6379 CONFIG GET repl-backlog-size# Recommend >= 512mb for large datasetsredis-cli -h localhost -p 6379 CONFIG SET repl-backlog-size 536870912# Check bind address — must be reachable from migration EC2redis-cli -h localhost -p 6379 CONFIG GET bind
Update Security Group of source EC2 to allow inbound 6379 from the migration EC2’s private IP.
Step 3 — Launch Migration EC2 and Install Redis Shake
# Launch a migration EC2 in the same VPC (Amazon Linux 2023)# t3.medium is sufficient for most datasets# Install Redis Shakecurl -Lo redis-shake.tar.gz \ https://github.com/tair-opensource/RedisShake/releases/download/v4.3.0/redis-shake-linux-amd64.tar.gztar -xzf redis-shake.tar.gzchmod +x redis-shake
Step 4 — Configure Redis Shake
Create shake.toml:
[function]# sync = live replication (RDB + AOF stream)# restore = one-shot RDB onlymode = "sync"[source]type = "standalone"address = "10.0.1.50:6379" # source EC2 Redis private IPpassword = "" # leave empty if no auth# username = "" # Redis 6+ ACL username if needed[target]type = "standalone"address = "valkey-prod.xxxxxx.ng.0001.use1.cache.amazonaws.com:6380"password = "your-auth-token" # ElastiCache AUTH tokentls = truetls_skip_verify = false # set true only for testing[advanced]# Parallel workers for RDB restore phasencpu = 4# Key filter — migrate all keys (default)# key_exists = "rewrite" # overwrite existing keys at target[log]level = "info"
TLS Certificate
ElastiCache uses AWS-signed certificates. If you hit TLS verification errors, download the AWS CA bundle: